Open topic with navigation
Adding a New Device
Several samples make use of a PCI DIO card. This section describes how to install a new device and make it visible to RTX.
Install the Card
- Shut down your system.
- Install the PCI card into an empty slot
- Reboot into Windows.
- If a window appears, asking if you want Windows to search for a driver, click Cancel.
The card should now be physically installed into the system. Drivers may, or may not be loaded.
Scan the PCI Bus to Identify the Device
Build and run the ScanBus sample program. Project files were installed with RTX into
the <RTXDIR>/samples/Pci directory. The scanbus.sln solution file is available to build
the scanBus.c application program in Visual Studio.
The output from scanbus includes vendor and device identifiers for each card on the PCI bus. Write down and save this
information for your new card. Most PCI device vendors can be identified by searching by Vendor ID on the
web page http://www.pcidatabase.com/.
Add Device Information to the INF File
Use the following steps to add the device to the RTX device INF file.
- Open the Windows Device Manager. To do this, right-click My Computer and select Properties from the pull-down menu. In the System Properties window, click Device Manager. Note that there is an unidentified PCI device.

Leave this window open.
- Open the RTX Properties control panel. To do this from the Start menu, select
IntervalZero > > RTX Properties.
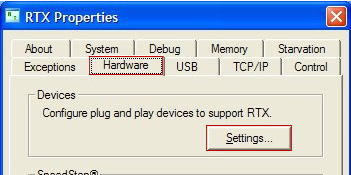
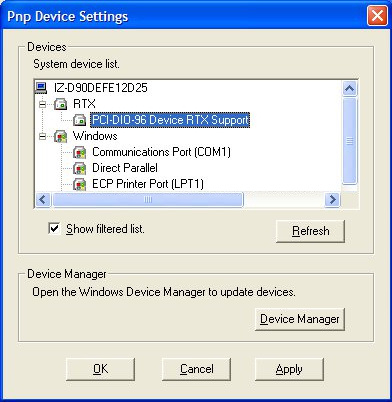
- In the RTX Properties Window, select the Hardware tab and then click Settings.
- In the PnP Device Settings window, right-click the new device and select Add RTX INF Support.

Click Apply for an entry to be added to the RTX INF file.
- Open the %SYSTEMROOT%
\inf\RTXPNP.inf file (where the default value of %SYSTEMROOT% is
C:\WINDOWS)
The last line should identify your new PCI device using the same vendor and device
identifiers that were displayed by the scanbus sample program. Edit this line to ensure the device
is correctly described. For example, change the last line from:
PCI Device RTX Supported"=RtxPnP_Inst,"PCI\VEN_1093&DEV_0160&SUBSYS_00000000&REV_00
To
PCI-DIO-96 Card RTX Support"=RtxPnP_Inst,"PCI\VEN_1093&DEV_0160&SUBSYS_00000000&REV_00
Add Device Support
Use the following steps to finish adding RTX support for the device.
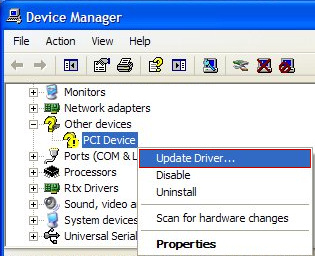
- Return to the Windows Device Manager window, right-click the unidentified PCI device and select
Update Driver... from the pull-down menu.
- Follow prompts in the Hardware Update Wizard, selecting options that indicate you do
not want Windows to select a driver, do not want the driver selected or installed
automatically, and do not want Windows to search for a driver.
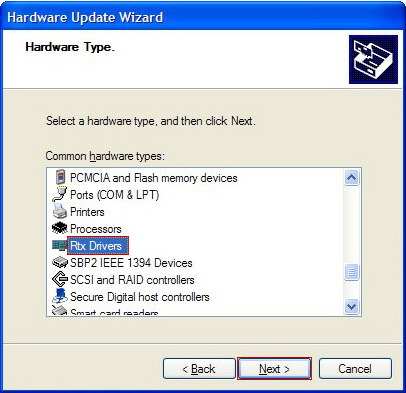
If the Hardware Type window appears, select Rtx Drivers.
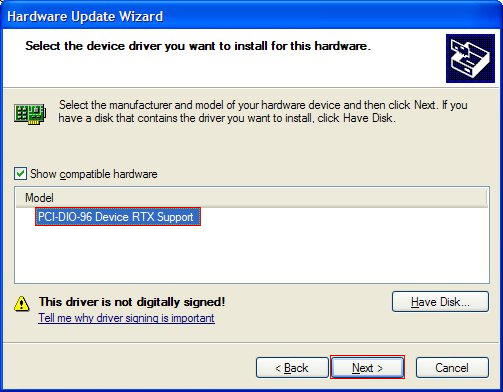
When the Hardware Update Wizard asks you to select the device driver you want to
install for this hardware, one of the options should include RTX support using the name you gave your device
in the RTX INF file. Select this line and click Next.
- When the Hardware Update Wizard is done, click Finish.
The device should now appear in the Windows Device Manager
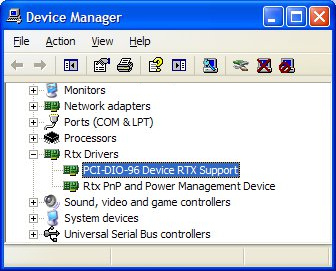
The device should also appear in the RTX Pnp Settings windows.
If an exclamation mark within a red circle appears next to the device name, right-click the device and select Properties from the pull-down menu to change the device IRQ.

NOTE: For more information on how to obtain a unique line-based IRQ, refer to the document
Working with Hardware Resource Limitations. To access this paper, log onto the IntervalZero
support page and look in the RTX Knowledge Base under the list of Hardware
topics.
