|
|
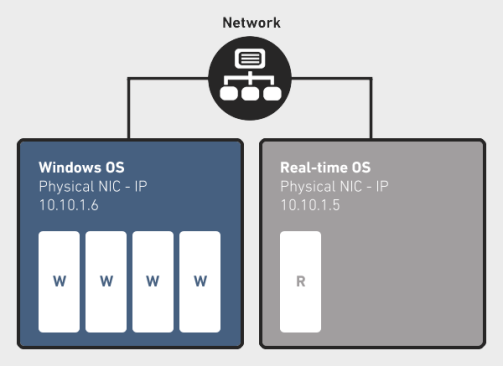
The RTX Virtual Network provides a virtual point-to-point connection between Windows and RTX that emulates a local area network connection on a system. The RTX Virtual Network Add-On allows developers the flexibility to use socket communication between processes on the same system with no additional hardware. The virtual network also allows for easy porting of multiple system applications to run on one system with no code changes.
This installation consists of a Windows Virtual RTX Ethernet Adapter and a RTX Virtual NIC which is used by the RT-TCP/IP Stack.

Topics:
If installed, the RtVirtual NIC driver is one of the drivers that is automatically registered upon enabling or disabling the RT-TCP/IP stack.
RtxTcpIp.ini file. For more information, see RTX TCP/IP Stack and Driver Configuration. For a complete list of configurable parameters, see NIC Driver Section.
In RTX, you must specify configuration settings for the RTX Virtual NIC driver in the RT-TCP/IP Stack. To do this, follow the steps below.
Steps:
C:\Program Files\IntervalZero\RTX by default).\bin directory, open the file RtxTcpIp.ini.NOTE: If you need help locating this file, you can find its current location by looking at the TCP/IP tab of the RTX Properties control panel.
RtxTcpIp.ini. Specify required values as related to your application.Under [TCP/IP]:
Under [rtndn]
Below is an example of a RtxTcpIp.ini file. Highlighted values are required for configuration of the RTX Virtual NIC Driver. You must specify required values as related to your application.
	[TCP/IP]
	MemoryInK=256
	TickInterval=200
	MaxSockets=30
	TimerPriority=66
	NumStartupEvents=20
	NumOfInterfaces=1

	[rtnd0]
	Driver=RtVirtualNic
	IPAddr=10.10.1.5
	Netmask=255.255.255.0
	InterruptPriority=64
	ReceivePriority=63
	TransmitPriority=12
	RxFifoSize=32
	TxFifoSize=32
	EA=1234567890AB
	NumXmitBuffers=8
IMPORTANT! The Subnet mask you specify in the RtxTcpIp.ini file must match the Subnet mask specified in Windows (see below).
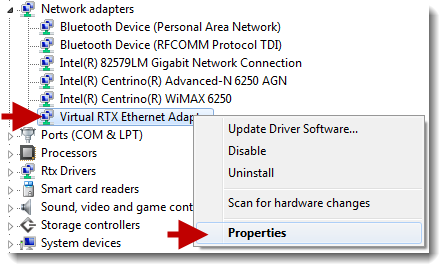
Next, configure values for the Virtual RTX Ethernet Adapter through Windows Device Manager.
Steps:

NOTE: Leave the Default gateway and DNS fields empty.
IMPORTANT! The Subnet mask you specify in Windows must match the Subnet mask specified in the RtxTcpIp.ini file.
IMPORTANT! Make sure the RTX Subsystem is stopped before you change configuration options for the RTX Virtual Network.
| Property |
Description |
|---|---|
| Jumbo Packet |
Enables the frame sizes larger than standard Ethernet MTU. The identical value must be set in the
Note: If you use multiple RTX NICs (one physical and one virtual), and enable Jumbo Packets with an MTU value of 16114, an exception may occur. To avoid this, increase the |
| RTX EA |
Not supported in this release. |
| RTX Location |
Not supported in this release. |
To test that the RTX Virtual Network is configured properly, follow the steps below:
Steps:
RtxTcpIp.ini file.IMPORTANT! You must not hibernate or suspend the system when the RTX Virtual Network is in use.
To build this driver with versions of RTX prior to RTX 2012, you must disable the post-build step to timestamp the RTSS binary in RtVirtualNic.vcxproj.

