Camera Setup
The RTX64 Vision Runtime includes a RTX64 Vision Camera Setup tool, which can be used to connect to supported cameras and provide setup information that could not be found or interpreted in the camera’s XML file. Using the tool, you can:
- Discover cameras connected to the system
- View and provide camera properties
Sections in this Topic:
Using the Tool
Below is a typical workflow for the RTX64 Vision Camera Setup tool.
To use the tool:
- Launch the RTX64 Vision Camera Setup tool (Start > RTX64 4.5 Vision Runtime > RTX64 Vision Camera Setup).
- Click Discover Cameras to identify connected cameras.
- Once camera discovery has completed, the Camera Model list is populated with discovered cameras.
- Choose a camera from the Camera Model drop-down menu. Camera properties are displayed (see Camera Properties and Control Registers below).
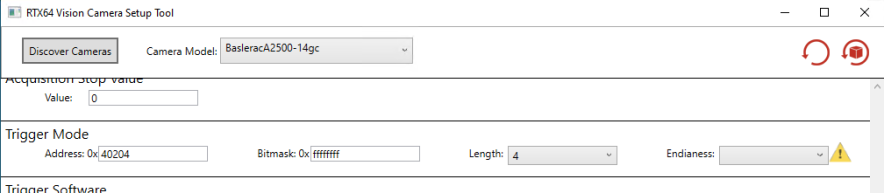
NOTE: A warning icon ( ) indicates a value that has not been properly identified and must be changed before the camera can be used. See Resolving an Unknown Camera Property below.
- Change camera properties as needed.
- Click Apply.
Camera Properties and Control Registers
When a discovered camera is selected, its properties appear. The camera properties, described below, have the following fields:
- The Address of the property’s register in the camera’s memory.
- The property’s Bitmask.
- The Length of the property’s register in bites.
- The property’s Endianess, which determines which bites go first (Big or Little).
Camera Properties
The camera properties that can be overwritten by the RTX64 Vision Camera Setup tool are displayed below.
NOTE: If a property is not available on the camera, it appears grayed-out in the tool.
| Property | Description |
|---|---|
| Width | The image width. |
| Height | The image height. |
| Maximum Width | The maximum image width. |
| Maximum Height | The maximum image height. |
| Acquisition Mode |
The method used by the camera to acquire an image. This can be controlled using functions RtGVSetAcquisitionMode and RtGVGetAcquisitionMode. Possible modes:
|
| Pixel Format | Controls the color mode (eg. RBG, monochrome, etc.) of the image pixel data. |
| Pixel Color Filter | Determines the color filter of raw image pixel data. This property applies to raw output of Bayer-filter cameras, such as the Point Grey Research/FLIR cameras supported by RTX64 Vision. |
Control Registers
The camera’s control registers that can be overwritten by the RTX64 Vision Camera Setup tool are displayed below.
NOTE: If a register is not available on the camera, it appears grayed-out in the tool.
| Register | Description |
|---|---|
| Continuous Mode Value | The value used to determine the camera’s Continuous Mode. |
| Acquisition Start | The register used to start image acquisition. |
| Acquisition Start Value | The value that must be written to the Acquisition Start register to start image acquisition. |
| Acquisition Stop | The register used to stop image acquisition. |
| Acquisition Stop Value | The value that must be written to the Acquisition Stop register to stop image acquisition. |
| Trigger Mode | The register used to enable or disable trigger acquisition. |
| Trigger Software | The register used to send a software trigger. |
| Trigger Software Value | The value that must be written to the Trigger Software register to send a software trigger. |
| Payload Size | The image size. |
| Trigger Source | The source of the acquisition trigger (Software or Hardware). |
| Software Trigger Source Value | The value that specifies the software trigger source. |
| OffsetX | The X offset, in pixels, of the image’s region of interest. |
| OffsetY | The Y offset, in pixels, of the image’s region of interest. |
Resetting Camera Properties
You can reset camera properties to their default value, or to the value set by the last Apply.
| Icon | Description |
|---|---|

|
Resets all changed camera properties to their values set by the last Apply. If Apply has not yet been selected, this option resets all properties to their default value. |

|
Resets all camera properties to their default value. |
Resolving an Unknown Camera Property
A warning icon () indicates a value that has not been properly identified and must be changed before the camera can be used. When this occurs, you must search the camera’s XML file (%public%\Documents\IntervalZero\RtVision\) for the proper value and manually enter it in the RTX64 Vision Camera Setup tool.
EXAMPLE
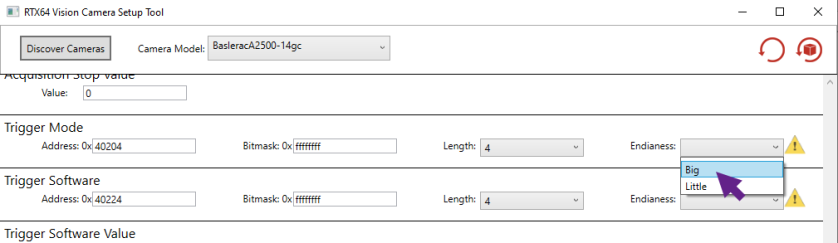
In this example, the Endianess field of the Trigger Mode register has not been properly retrieved by the RTX64 Vision Camera Setup tool.
To resolve this scenario, you would look in the camera’s XML file for the Endianess value of the Trigger Mode property, and enter that value in the RTX64 Vision Camera Setup tool.
Steps:
- In Explorer, locate the XML file for the selected camera under
%public%\Documents\IntervalZero\RtVision\.
NOTE: This file may need to be unzipped first.
- Open the XML file, and then search the XML file for the camera property under which the warning appears in the RTX64 Vision Camera Setup tool. In this example, we want to search for TriggerMode.
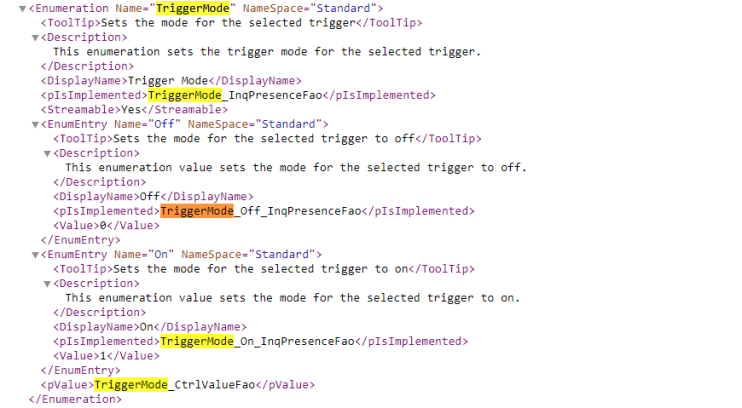
In this XML, we can see that the TriggerMode enumeration points to a different value called TriggerMode_CtrlValueFao:
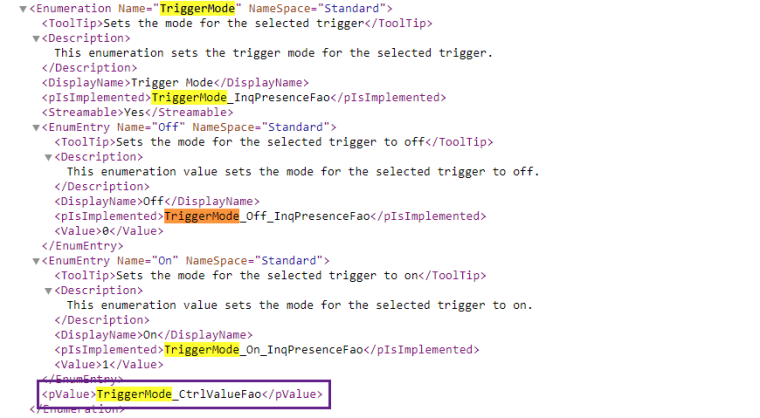
If we search the XML for TriggerMode_CtrlValueFao, we can see it points to another value: TriggerMode_CtrlValueFao_Reg.
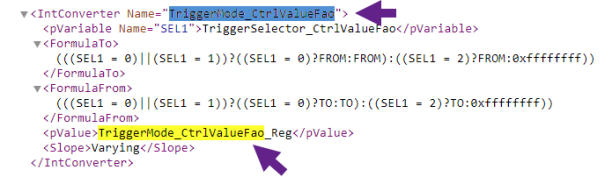
If we search for TriggerMode_CtrlValueFao_Reg, we can see that its Endianess value is BigEndian:

We can then set the Trigger Mode Endianess field in the the RTX64 Vision Camera Setup tool to Big: