To open Channel Editor, select the Channel Editor icon on the Message Viewer toolbar.
To start adding channels and configure the corresponding message formats:
- Open Channel Editor by selecting the Channel Editor icon on the toolbar of Message Viewer. The Open Configuration File window will appear. Choose a channels configuration file to edit. There are four options:
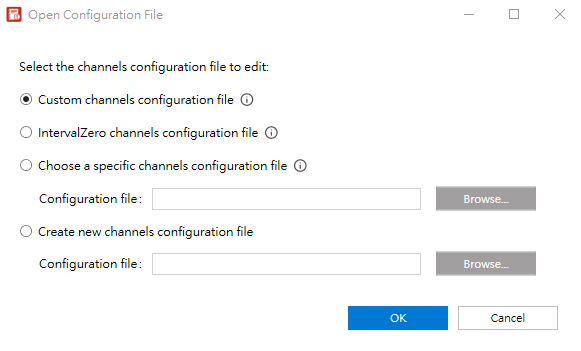
- Custom channels configuration file: This file allows users to add custom message channels for their applications and is selected by default. The file is located at C:\Program Files\IntervalZero\MaxRT\wRTOS\Tools\MessageViewer\ChannelsConfig\CustomChannelsConfig.xml
- IntervalZero channels configuration file: This file contains message channels created by IntervalZero. To avoid losing custom channels during version upgrades, we recommend not adding message channels to this file. The file is located at C:\Program Files\IntervalZero\MaxRT\wRTOS\Tools\MessageViewer\ChannelsConfig\IZChannelsConfig.xml
- Choose a specific channels configuration file: You can select a specific configuration file stored elsewhere. For example, you can choose a file stored in your source code control system, which makes it easier to save changes in source control. When your applications are ready for release, you can import the channels from this file into the Custom Channels configuration file. See Import and Export Channels.
- Create new channels configuration file: Select this option to create a new file. Select Create to find a file path and input a file name.
After choosing a file, its path will be displayed in the title bar. To choose another configuration file, select ![]() Open channels configuration file.
Open channels configuration file.
Note: The Message Viewer only uses CustomChannelsConfig.xml and IZChannelsConfig.xml to log channels. If the Message Viewer detects channel conflicts between these two files, the IZChannelsConfig.xml file will take priority.
Note: Channel conflicts arise if one of the following conditions occur:
The owner vendors have the same ID.
The owner products have the same ID.
The channel names or IDs are identical.
- Select
 to add a channel.
- Input a Vendor name and Vendor ID. Select Next.
- Existing vendor: If you have added vendors, you can select a vendor from the list.
- New vendor: Input a vendor name and ID. To prevent channel conflicts, please use the vendor's CustomerId from the wRTOS SDK license as its vendor ID. Vendor ID 0 is reserved for IntervalZero.
- Input a Product name and Product ID. Select Next.
- Existing product: If you have added products, you can select a product from the list.
- New product: Input a product name and ID. To prevent channel conflicts, please input a unique identifier for the product ID.
- Select a channel type and input a name and ID for this channel.
- Type: Select a channel type. There are two options, Standard and Trace. You can't change the type after it's been set through here.
- Channel name: Input a channel name. To prevent channel conflicts, please input a unique name.
- Channel ID: Input a channel ID. To prevent channel conflicts, please input a unique identifier.
- Select OK. The channel is added to the list located in the left pane.
- Repeat steps a-d to add more channels. You can add multiple products under a vendor and channels under a product.
- To edit or delete the created vendor, product or channel, right-click it on the list and select Edit or Delete. You can also add a vendor, product or channel through this method.
- Configure the message types and formats for the created channels. Select a channel from the list in the left pane. The corresponding setting tabs, including Properties, Message types, Enumerations, and Sources, are displayed in the right pane to configure.
- Select Apply to save the configuration file or select OK to save the configuration file and close Channel Editor. If you have enabled Automatically generate C++ code when configuration changes are applied in Code generation, C++ code will be automatically generated every time you select the OK or Apply button.
- Optionally import channels to the opened configuration file or export channels from the opened configuration file. See Import and Export Channels.
Properties
Select a channel from the list and then select the Properties tab. You can configure the basic information of a channel.
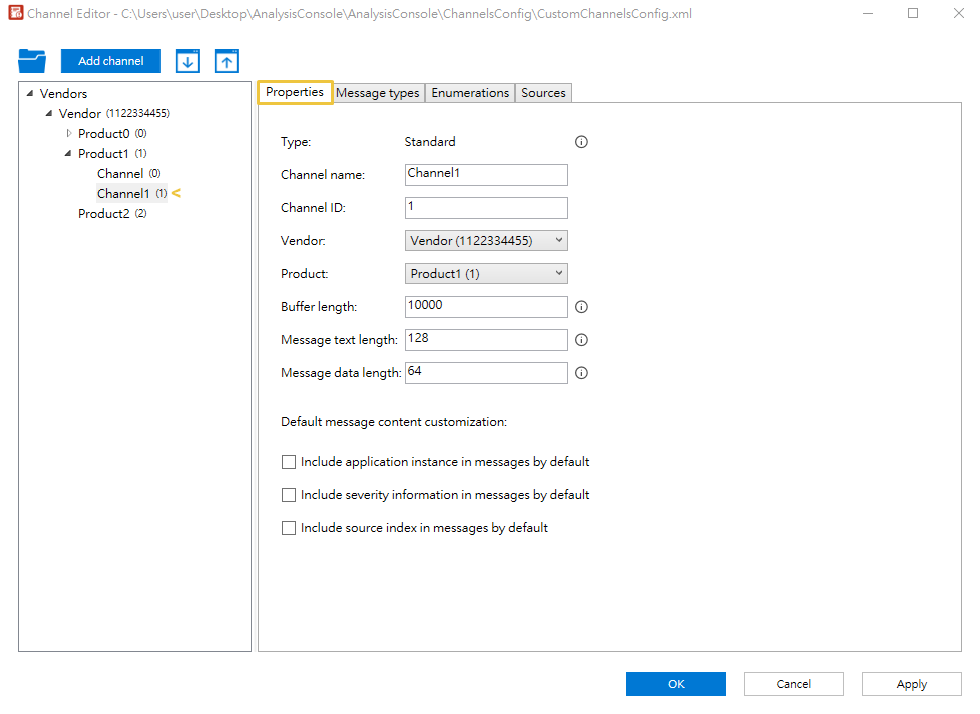
- Type: Displays the channel type.
- Channel name: Displays the channel name. You can edit the name.
- Channel ID: Displays the channel ID. You can edit the ID.
- Vendor: Displays the vendor name of this channel. You can change the vendor.
- Product: Displays the product name of this channel. You can change the product.
- Buffer length: The number of messages in the queue. This value is between 100 and 20,000. The recommended value is 10,000.
- Message text length: The maximum length of the message text in characters. The value is between 0 and 128.
- Message data length: The maximum length of the message data in bytes. The value is between 0 and 512.
- Source count: This option is only available for Trace channels. Source count specifies the number of sources that require an index filter. The value is between 0 and 31. For example, you can set the value to 5 to enable indexes 0-4 for index filtering.
- Default message content customization: Select the desired items, such as application instance, severity, or source index, to be included in messages by default. You can also include or exclude these items through Message Content.
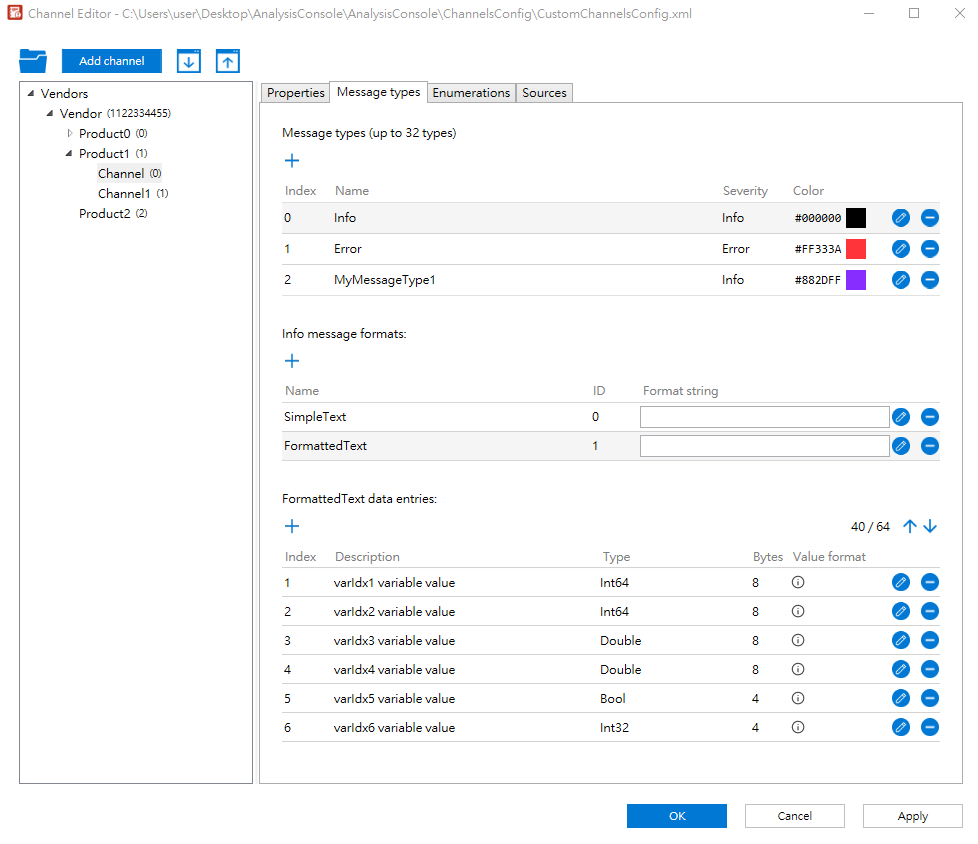
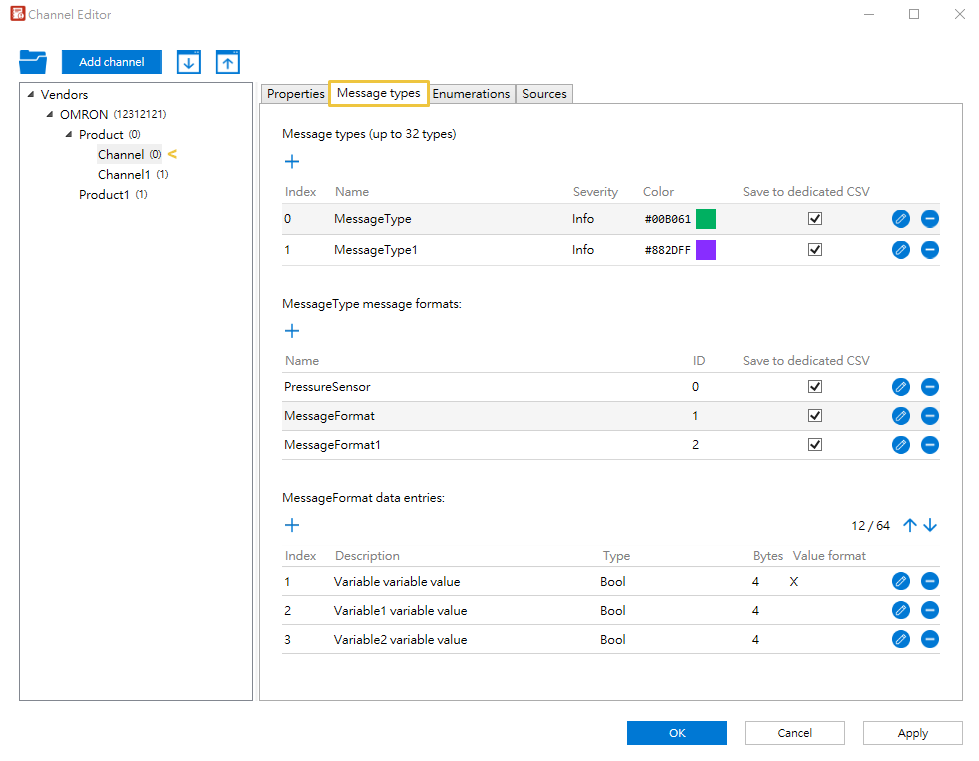
Message types
Select a channel from the list and then select the Message types tab. The settings will vary depending on the channel type. You can create message types to categorize messages and configure the corresponding formats and data entries. These configurations will be used by the Message Viewer when parsing the data sent by RtdbgSendMessage.
Standard Channel
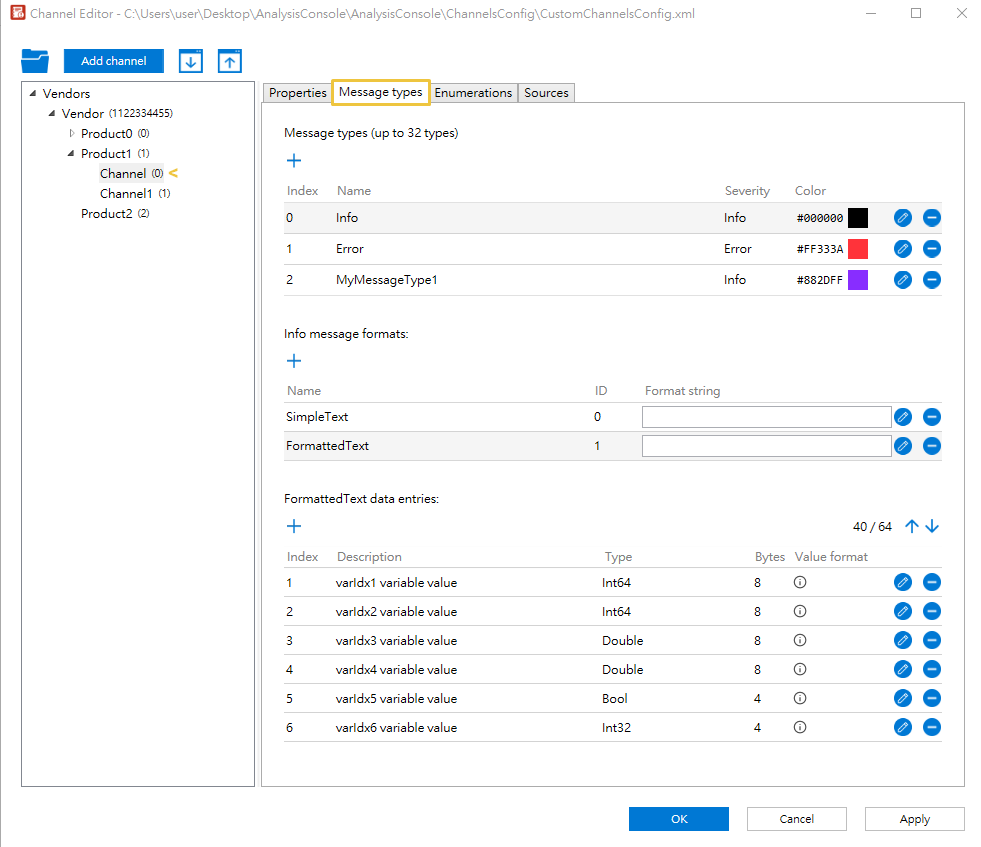
- Message types: By default, three message types, Info, Error, and MyMessageType1, are automatically created when adding a Standard channel. You can edit or delete them. To add a new message type, select
 , configure the following settings and select OK. This message type will be added to the list. Up to 32 message types can be added.
- Index: Input an index for this message type.
- Name: Input a name for this message type. The name must be unique across all message types under the same channel and follow C# variable naming rules.
- Severity: Select a severity for this message type.
- Color: Select a color for this message type. The text of this message type will be applied with the specified color on the Message Viewer. You can also specify a custom color by inputting a hex color code.
- (MessageType) message formats: When a message type is selected, its message formats will be displayed here. You can define message formats by including text or variables in the messages to construct them or specify a print format. By default, two message formats are automatically created for each message type in Standard channels:
- SimpleText: only contains text in messages. The text is parameter pText in RtdbgSendMessage.
- FormattedText: contains text and variable values in messages. This format contains six fixed-type variables by default.
- Select a message type from the above Message types section.
- Select and configure the following settings:
- Name: Input a name for this message format. The name must be unique across all message formats under the same message type and follow C# variable naming rules.
- ID: Input an index for this message format.
- Format string: This box is optional. You can leave it blank to use parameter pText in RtdbgSendMessage as the format string. Alternatively, input a format string, e.g., {0} Sensor value: {1}, where {0} represents parameter pText in RtdbgSendMessage, and {1} represents the value of data entry index 1 in the MessageFormat data entries section below.
You can specify a print format for variables using .NET's string.Format method (e.g., Sensor value: {1:X} prints the variable in hexadecimal format).
Unlike Standard channels, the variable format for Trace channels must be specified when adding data entries. See Format string for Trace messages.
- Select OK, this message format will be added to the list.
- Repeat steps 1-3 to add more message formats.
To add a new message format for a message type:
- (MessageFormat) data entries: When a message format is selected, its variables will be displayed here. You can define variables and their data types. By default, six fixed-type variables are automatically created for FormattedText in Standard channels. You can edit or delete them. To add a new variable:
- Select a message format from the above Message formats section.
- Select and select an option from the Type drop-down. There are four options:
- Fixed type variable: Select this option to add a variable with a fixed data type. Input a unique name based on the C# variable naming rules, choose a data type and select OK to add the variable to the list. Optionally specify a format for fixed-type variables in the corresponding Format string column.
If you have created enumeration types, they will be listed in the Data type drop-down for you to select.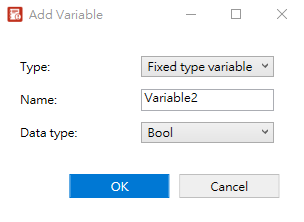
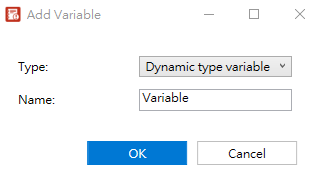
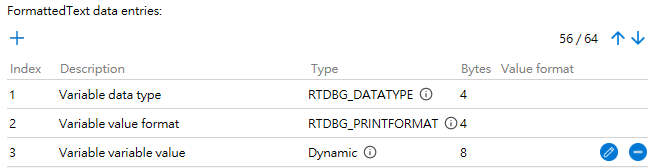
- Dynamic type variable: Select this option to dynamically specify variable data type, print formats and values for a variable when using RtdbgSendMessage. Input a unique name based on the C# variable naming rules and select OK. Three entries for this variable will be generated on the list, including data type, value format and variable value (all prefixed with the given name).
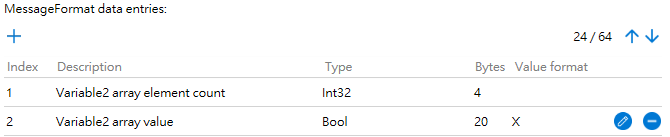
- Array variable: Select this option to include an array in your messages. Input a unique name based on the C# variable naming rules, select an element type, input a maximum element count, and optionally input an element format. Select OK, two entries for this variable will be generated on the list, including array element count and array value (prefixed with the given name).
If you have created enumeration types, they will be listed in the Element type drop-down for you to select.
The element format is based on .NET's string.Format method. For example, input X to print the element in hexadecimal format.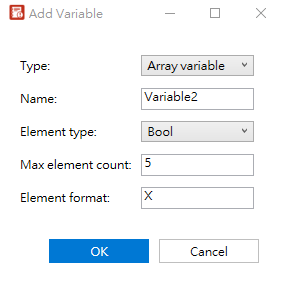
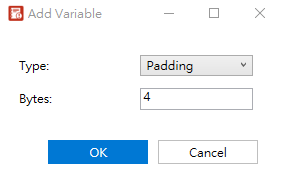
- Padding: Select this option to add padding to ensure the data entries are properly aligned (e.g., 16 bytes aligned). The padding size ranges between 0 and 1,000 bytes.
- Fixed type variable: Select this option to add a variable with a fixed data type. Input a unique name based on the C# variable naming rules, choose a data type and select OK to add the variable to the list. Optionally specify a format for fixed-type variables in the corresponding Format string column.
- Repeat steps 1-2 to add more variables for each message format.
TIP: You can use the ![]() Move up or
Move up or ![]() Move down buttons to arrange variables and paddings. The numbers beside
Move down buttons to arrange variables and paddings. The numbers beside ![]() represent the used and maximum data length. For example, 44/64 indicates that 44 bytes of data have been used out of a maximum of 64 bytes. You can configure the maximum data length in Properties.
represent the used and maximum data length. For example, 44/64 indicates that 44 bytes of data have been used out of a maximum of 64 bytes. You can configure the maximum data length in Properties.
Note: Variable names should be unique across all variables under the same format and follow C# variable naming rules (see Composite Formatting for more details). To prevent name conflicts when generating code, variable names must not end with _DATATYPE, _PRINTFORMAT or _ARRAY_ELEMENT_COUNT.
Trace Channel
Except for the following settings, the message type settings of Trace channels are essentially the same as those of Standard channels. See "Standard Channel" in Message Types.
- Default Message types (Info, Error and MyMessageType1) and Message formats (SimpleText and FormattedText) are only available for Standard channels. Users need to create new message types and message formats for each Trace channel. See Message types and Message formats.
- There is no Format string setup column in the Message formats field because formats must be specified in the Value format box when adding data entries. If you leave the Value format box blank, the default C# value format will print the value.
- The Save to dedicated CSV option is available in both the Message types and Message formats fields. To save a specific message type in a separate CSV file, select this option. Note that Message Formats take precedence. Following are some scenarios:
- Scenario 1: Save to dedicated CSV is enabled for all message types and formats.
- Message type A with Save to dedicated CSV enabled
Message type A message format 1 with Save to dedicated CSV enabled
Message type A message format 2 with Save to dedicated CSV enabled - Message type B with Save to dedicated CSV enabled
Message type B message format 3 with Save to dedicated CSV enabled
Message type B message format 4 with Save to dedicated CSV enabled - File 1 contains Message type A with format 1
- File 2 contains Message type A with format 2
- File 3 contains Message type B with format 3
- File 4 contains Message type B with format 4
- Scenario 2: Save to dedicated CSV is disabled for all message types and formats.
- Message type A with Save to dedicated CSV disabled
Message type A message format 1 with Save to dedicated CSV disabled
Message type A message format 2 with Save to dedicated CSV disabled - Message type B with Save to dedicated CSV disabled
Message type B message format 3 with Save to dedicated CSV disabled
Message type B message format 4 with Save to dedicated CSV disabled - Scenario 3: Save to dedicated CSV is disabled for all message types and enabled for some of their corresponding message formats:
- Message type A with Save to dedicated CSV disabled
Message type A message format 1 with Save to dedicated CSV disabled
Message type A message format 2 with Save to dedicated CSV disabled - Message type B with Save to dedicated CSV disabled
Message type B message format 3 with Save to dedicated CSV enabled
Message type B message format 4 with Save to dedicated CSV disabled - One contains Message type A with format 1 and 2, and Message type B with format 4
- The other contains Message type B with format 3
- Scenario 4: Save to dedicated CSV is enabled for some message types and some of their corresponding message formats.
- Message type A with Save to dedicated CSV enabled
Message type A message format 1 with Save to dedicated CSV enabled
Message type A message format 2 with Save to dedicated CSV disabled - Message type B with Save to dedicated CSV disabled
Message type B message format 3 with Save to dedicated CSV enabled
Message type B message format 4 with Save to dedicated CSV disabled
Message type B message format 5 with Save to dedicated CSV disabled - Message type C with Save to dedicated CSV disabled
Message type C message format 6 with Save to dedicated CSV disabled - File 1 contains Message type A with format 1
- File 2 contains Message type A with format 2
- File 3 contains Message type B with format 3
- File 4 contains Message type B with format 4 and 5, and Message type C with format 6
Example:
There will be 4 CSV files:
Example:
There will be only one CSV file that saves both message types A and B and their corresponding message formats for this channel.
Example:
There will be 2 CSV files:
Example:
There will be 4 CSV files:
- Scenario 1: Save to dedicated CSV is enabled for all message types and formats.
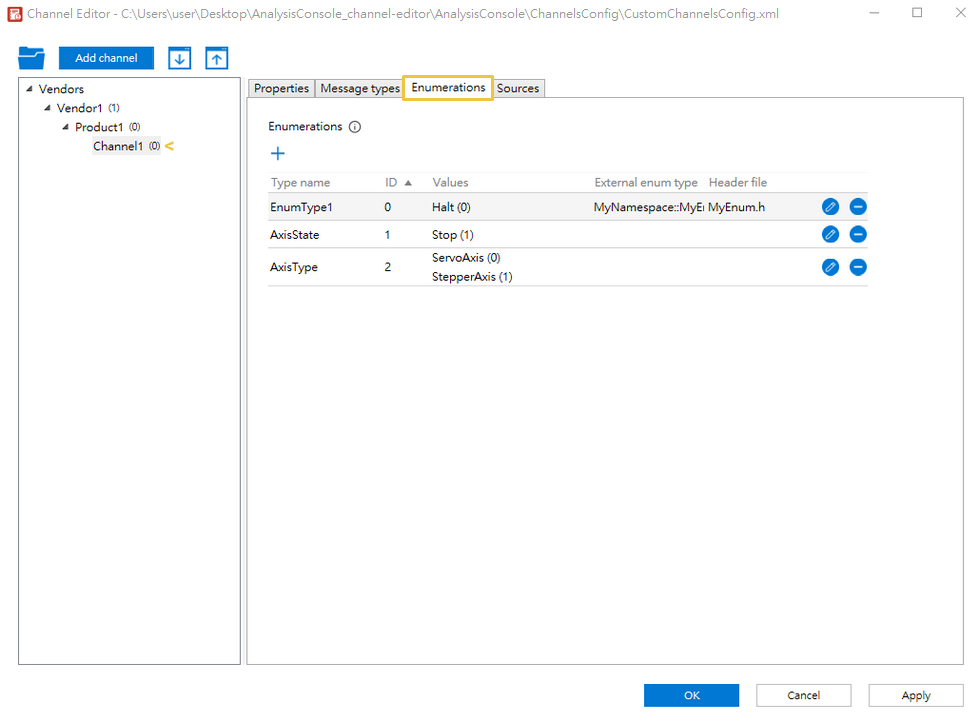
Enumerations
Select a channel from the list and then select the Enumerations tab. You can create enumeration types for variables. For example, if you set a message format as The axis is in the {0} state, you can add an enumeration AxisState with a parameter Halt. The message will show:
The axis is in the Halt state
To add an enumeration type:
- Select to add an enumeration type. The ID for this enumeration type is automatically generated.
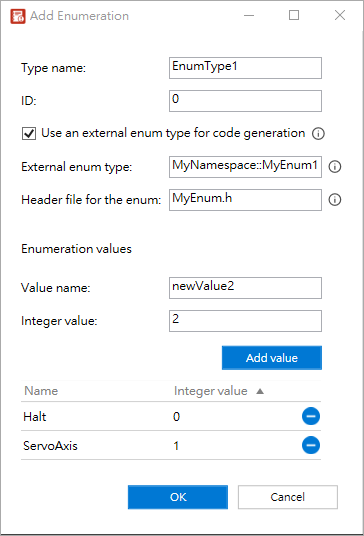
- Input a name in the Type name input box. The name must be unique across all enumeration types under the same channel and follow C# variable naming rules.
- To define this enumeration type, input a name and an integer value in the Enumeration values section. The name must be unique across all values in the enumeration type and follow C# variable naming rules. Select the Add value button. This value will be listed in the field below. Repeat this step to add more values.
- If you want to use an enumeration type defined outside of the tool for the tool to generate send message methods, select Use an external enum type for code generation, and the following two input boxes appear:
- External enum type: Input a fully qualified name of the external enumeration for code generation, e.g., MyNamespace::MyEnum. Empty string is not allowed. This enumeration type will be used as the parameter in the generated send message method.
- Header file for the enum: Input a header file name containing the external enumeration. The file name must have a ".h" extension (e.g., MyEnum.h). An include statement will be generated in the header file when activating Code Generation.
Note: Once the external enumeration type is applied, the header file generated from Code Generation will no longer include the definition of the custom enumeration defined in Step 3.
- Select OK to add this enumeration type. You can select the created enumeration types when adding fixed type variables or array variables.
Sources
Select a channel from the list and then select the Sources tab. You can define source types for standard or trace messages. Each message can have a customized source to help users filter log messages.
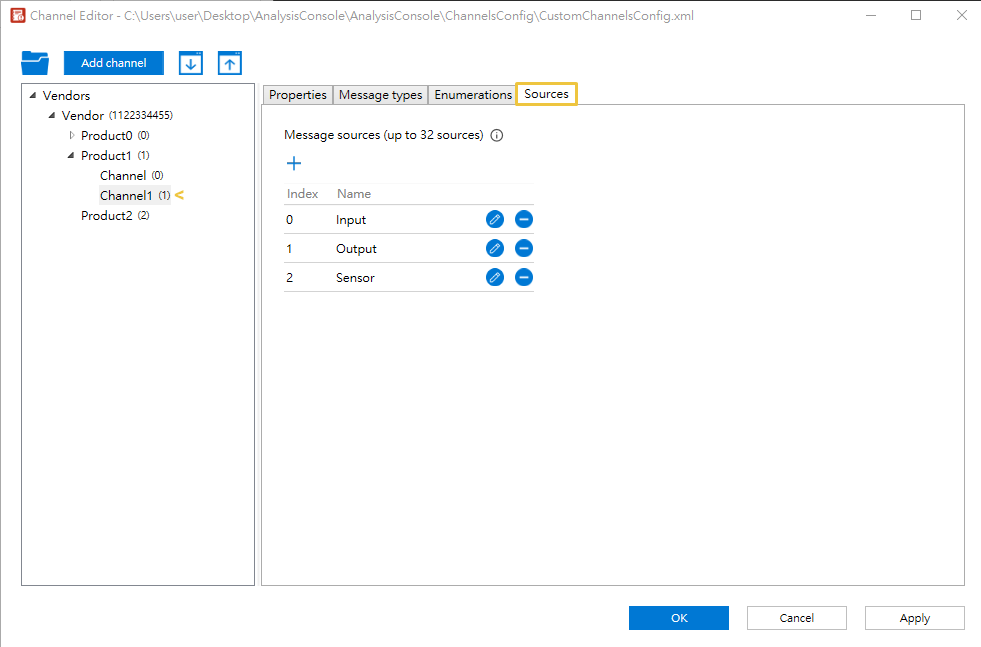
To add a source type:
- Select and input a source name. The name must be unique across all sources under the same channel and follow C# variable naming rules.
- Select OK to add this source type.
- Repeat steps 1-2 to add more source types. The created source types will be displayed in the Sources field of Log Selection. Up to 32 sources can be added.
Code Generation
Select a product from the list to access the Code generation tab and generate C++ header and source files based on the product's configuration settings.
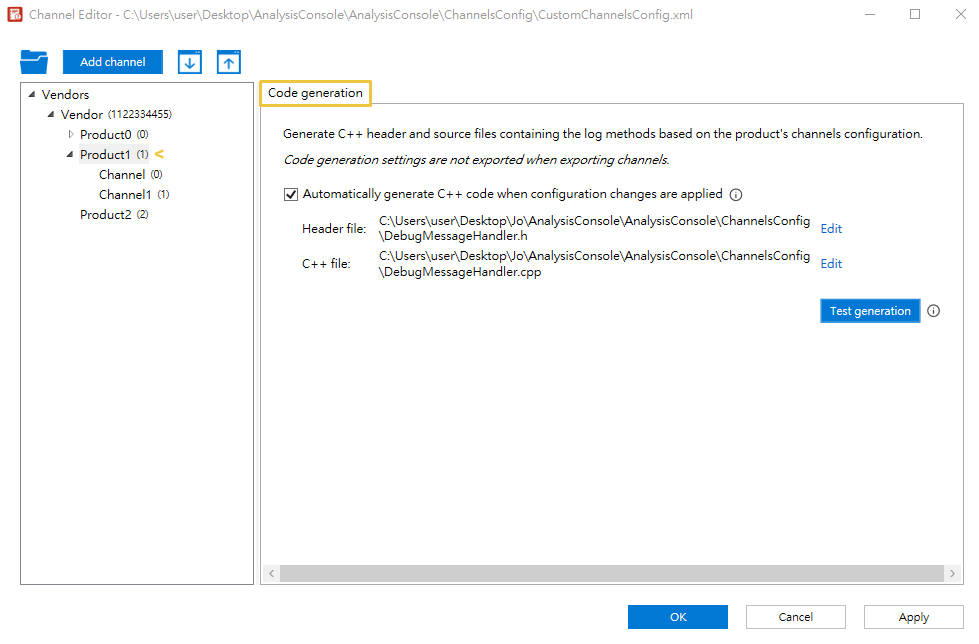
- Automatically generate C++ code when configuration changes are applied: Select this option to automatically generate C++ code and a header file every time you select the OK or Apply button for configuration settings. When selecting this option, the Code Generation Settings window will appear. Select Browse if you want to change the file path.
- Edit: Select to edit the class name and file path. The class name will be used as the file name and follow C# variable naming rules.
- Test generation: This button is only available when Automatically generate C++ code when configuration changes are applied is enabled. Select it to immediately generate the C++ code and a header file, including any unapplied configuration changes.
Import and Export Channels
Different applications have their own configuration files. To import channels from one file to another, use the Import channels function. To export channels from the opened configuration file, use the Export channels function.
Note: You can alternatively use the Channel Importer tool with the command line to import channels from one XML file to another.
To import channels to the opened configuration file:
- Select
 Import channels on the toolbar.
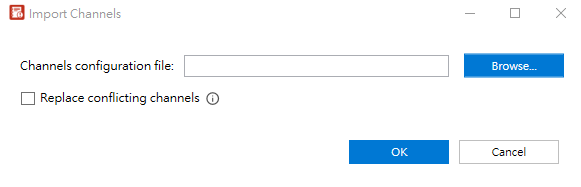
- Select Browse to choose a channels configuration file. You can enable Replace conflicting channels to force the replacement of conflicting channels.
- Select OK.
To export channels from the opened configuration file:
- Select
 Export channels on the toolbar.
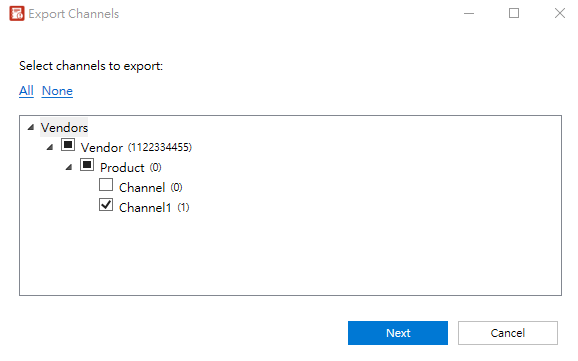
- Choose the desired channels and select Next.
- Select a directory and input a file name. Select Save.
