This section provides information about the wRTOS Message Viewer user interface. To perform various functions, select the icons on the top toolbar. The logged messages are displayed in the Message View panel at the bottom.
To log messages on the Message Viewer:
- Open the Message Viewer.
- Use Channel Editor on the toolbar to define message channels and formats. This step is only necessary for Standard and Trace channels. For the Basic channel, please skip this step.
- To log messages from the Basic and Standard channels, select Start in General log to begin logging, then choose the channel you want to view from the Channel List drop-down.
- To log messages from the Trace channels, select the messages to log in Log Selection, select Start in Trace log to begin logging, then choose the channel you want to view from the Channel List drop-down. Select the Refresh icon to update the screen and display the latest messages.
- If you want to display messages from two different channels simultaneously, select Dual from the View drop-down list, and then select a channel for each view.
- Start your real-time applications. Use the Debug Message APIs to create message channels and send messages.
Note: If messages are not displayed, check whether the messages have been enabled (see "Enable channel" in Log Selection), or whether the messages have been filtered (see Filter).
Function Icons on the Toolbar
Icons on the Message Viewer toolbar:
| Icon | Name | Description |
|---|---|---|
|
|
Stop; Save |
The General log displays messages from both the Basic and Standard channels. Select the Start icon to start logging messages. The icon will change to Stop after you select Start. To stop logging messages, select Stop. Select the Save icon to save the messages in text format files. This icon becomes available after you select the Start icon. When this icon is selected, the Message Viewer continuously saves the messages automatically. When it's not selected, the messages are not saved. To open the storage folder, select Open. To change a storage folder, see "Destination folder" in Settings. Note: When you select Start, only chosen messages from enabled channels in the Log Selection are written to shared memory first. The Message Viewer then reads and displays these messages in the Message View. To ensure that channels send messages, make sure they are enabled in the Log Selection. |
|
|
Stop; Save |
The Trace log displays messages from the Trace channel. Select the Start icon to start logging messages, then select the Refresh icon to update messages on the screen. The Start icon will change to Stop after you select Start. To stop displaying messages, select Stop. Select the Save icon to save the messages in CSV format files. This icon becomes available after you select the Start icon. When this icon is selected, the Message Viewer continuously saves the messages automatically. When it's not selected, the messages are not saved. To open the storage folder, select Open. To change a storage folder, see "Destination folder" in Settings. Note: When you select Start, only chosen messages from enabled channels in the Log Selection are written to shared memory first. The Message Viewer then reads and displays these messages in the Message View. To ensure that channels send messages, make sure they are enabled in the Log Selection. |
|
|
Open |
Select this icon to open the folder that saves the message files. You can change the storage folder or determine the file size and the number of files stored in a folder, see "Log to files" in Settings. |
|
|
Log selection |
Select this icon to choose the messages you want to log (see Log Selection). You can then use the filter function to exclude specific messages from displaying on the Message Viewer (see Filter). |
|
|
Single; Dual |
Select Single from the drop-down list to display messages in a single view. Select Dual from the drop-down list to display messages in a dual view. See View Mode under Message View. |
|
|
Settings |
Select this icon to configure general message settings. See Settings. |
|
|
Channel Editor |
Select this icon to define message formats and their corresponding data structures. See Creating Custom Message Channels using Channel Editor. |
|
|
Help |
Select this icon to display the Message Viewer help. |
|
|
About |
Select this icon to display the information about Message Viewer. |
Icons on the View toolbar:
| Icon | Name | Description |
|---|---|---|
|
|
Hide; Show |
If Dual is selected for view mode, you can use these icons to hide or show the View window. |
|
|
Channel List |
After selecting a view mode, you can select a channel from the drop-down list to display its messages. Note: Only the enabled channels are displayed on the Channel List. To enable channels, see "Enable channel" in Log Selection. |
|
|
Error count |
Displays the number of general and fatal error messages. You can hover over the icon or numbers to reveal error details. |
|
|
Warning count |
Displays the number of warning messages. You can hover over the icon or numbers to reveal the details. |
|
|
Refresh |
This icon only appears in the Trace channel view. Select it to update the screen and display the latest messages as the Trace channel generates many messages. |
|
|
Filter |
Select this icon to include or exclude specific messages for displaying on the Message Viewer. When the filter is applied, the icon will include a green check mark. See Filter. Note: The filtered (deselected) messages are hidden from view but remain recorded in the background. |
|
|
Search |
Select this icon to search for specific messages from the view. See Search. |
|
|
Export |
Select this icon to export messages on the view to a text file format. You can use Filter to exclude certain messages from the view and export only the desired ones. |
|
|
Clear |
Select this icon to clear all messages from the view. |
Log Selection
You can select messages to be logged using Log Selection. To open the Log Selection window, select Log Selection on the toolbar.
General Channels
In the Log Selection window, select the General Channels tab to enable the desired messages for Basic and Standard channels.
General Messages - Basic channel:
Select a Basic message channel from the left-side pane and then enable the channel and choose message categories or message severities.
Note: Only chosen messages from enabled channels are logged when selecting Start in the General log.
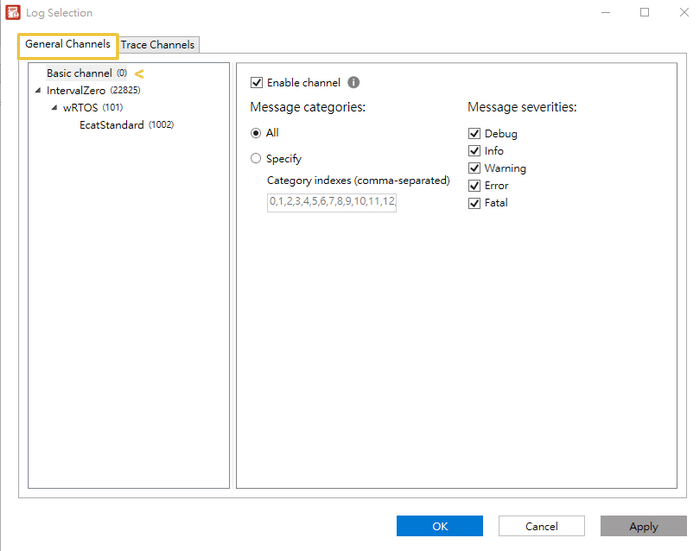
- Enable channel (default): Select a channel from the left-side pane and then check this box to receive messages for this channel. Unchecking the box will delete all received messages, close the channel, and release system memory. This option can only be changed when the General log is stopped. When Enable channel is selected, the corresponding options, such as message categories and message severities, will appear below this field.
- Message categories:
- Select All to log all basic messages from your application.
- Select Specify and enter the desired indexes to specify the message type. When Specify is selected, all available category indexes (0 to 63) are listed by default in the Category indexes box. Message types are defined in the Channel Editor. If message categories have been set up using RtdbgSetBasicCategoryName, the category options will be displayed for selection.
- Message severities: Select the severity of the messages from your application. See RTDBG_SEVERITY for more details about severity.
General Messages - Standard channel:
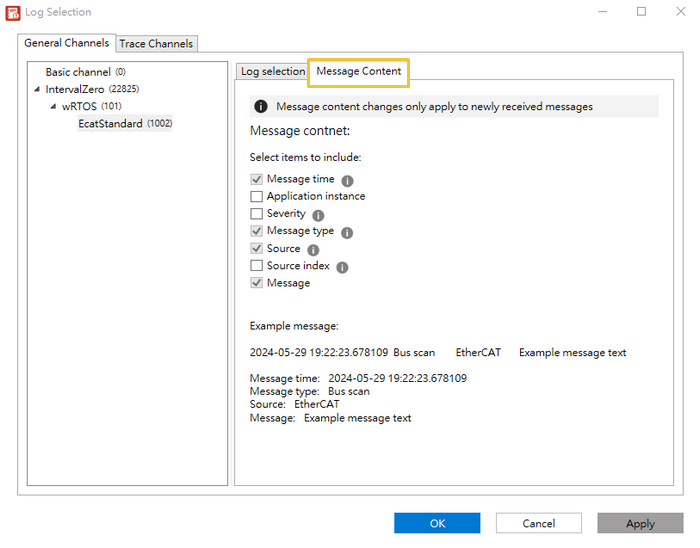
Select a Standard message channel from the left-side pane and then select the Log selection tab to enable the channel and choose message types or sources or select the Message Content tab to choose items to be included in the message.

Select the Log selection tab to enable the channel and choose message types or sources.
Note: Only chosen messages from enabled channels are logged when selecting Start in the General log.
- Enable channel (default): Select a channel from the left-side pane and then select this box to receive messages for this channel. Clearing selection of the box will delete all received messages, close the channel, and release system memory. This option can only be changed when the General log is stopped. When Enable channel is selected, the corresponding options, such as message types and message sources, will appear below this field.
- Message types: Select message types defined in the Channel Editor. The icons appearing alongside the message type names represent their severities.
- Sources: Select source types, which are defined in the Channel Editor.
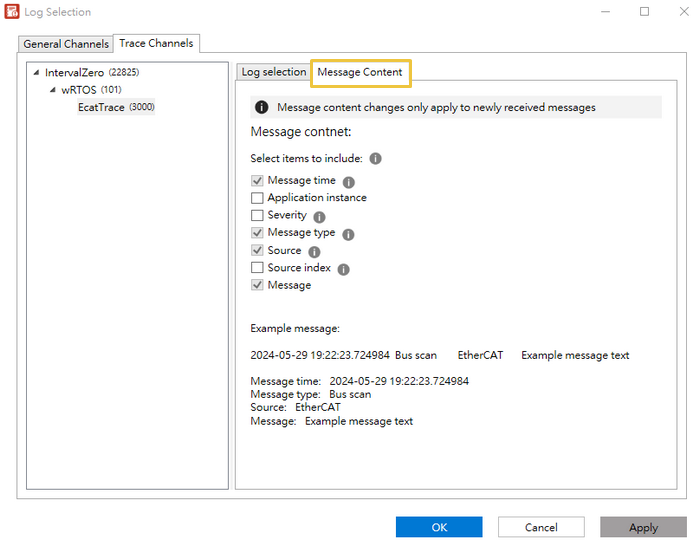
Select the Message Content tab to choose items to be included in the message.
Trace Channels
In the Log Selection window, select the Trace Channels tab, then select a channel. You can then select the Log selection tab to enable the channel, choose message types or sources and specify certain source indexes, or select the Message Content tab to choose items to be included in the message.
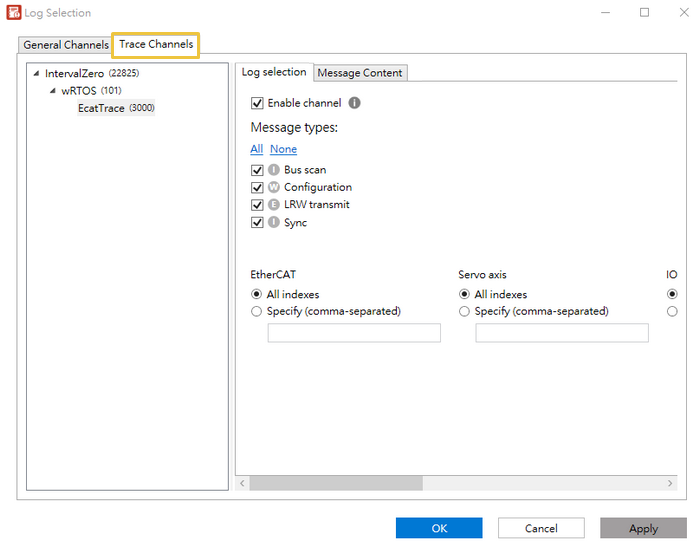
Select the Log selection tab to enable the channel, choose message types or sources and specify certain source indexes.
Note: Only chosen messages from enabled channels are logged when selecting Start in the Trace log.
- Enable channel: Select a channel from the left-side pane and then check this box to receive messages for this channel. Unchecking the box will delete all received messages, close the channel, and release system memory. This option can only be changed when the Trace log is stopped. When Enable channel is selected, the corresponding options, such as message types, message sources and source index filter, will be displayed below this field. By default, this option is not selected for Trace channel. Please enable this option and select the following message types or sources for logging.
- Message types: Select message types defined in the Channel Editor. The icons appearing alongside the message type names represent their severities.
- Sources: Select source types, which are defined in the Channel Editor.
- Source index filter: Select a source by specifying its index. The indexes are defined in the Channel Editor.
- Select All indexes to select all indexes of sources.
- Select Specify and enter indexes in the box to specify source indexes. Up to 4 indexes can be entered, separated by commas (e.g., 0, 7, 3). For example, if a source is named Sensor, select Specify in the Sensor field, and enter "0, 7, 3" in the box, the Sensor 0, Sensor 7, and Sensor 3 are selected.
Select the Message Content tab to choose items to be included in the message.
To select messages using Log Selection:
- Stop the General or Trace log in advance by selecting the Stop icon.
- Open Log Selection, select the General Channels or Trace Channels tab to choose the desired messages for each channel.
- Select Apply to save the changes.
Note: After selecting messages, you can use the filter function to exclude specific messages from displaying on the Message Viewer (see Filter).
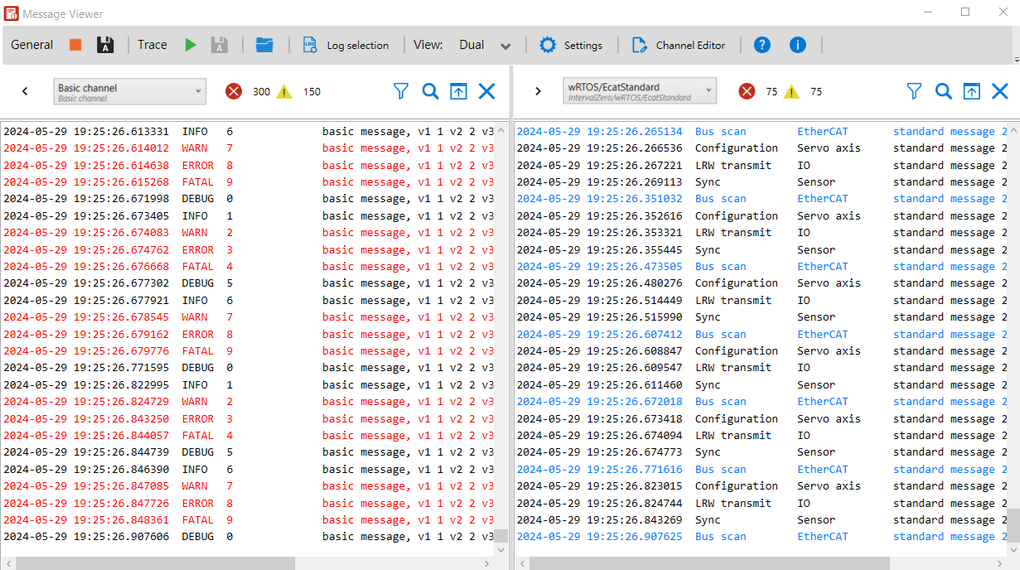
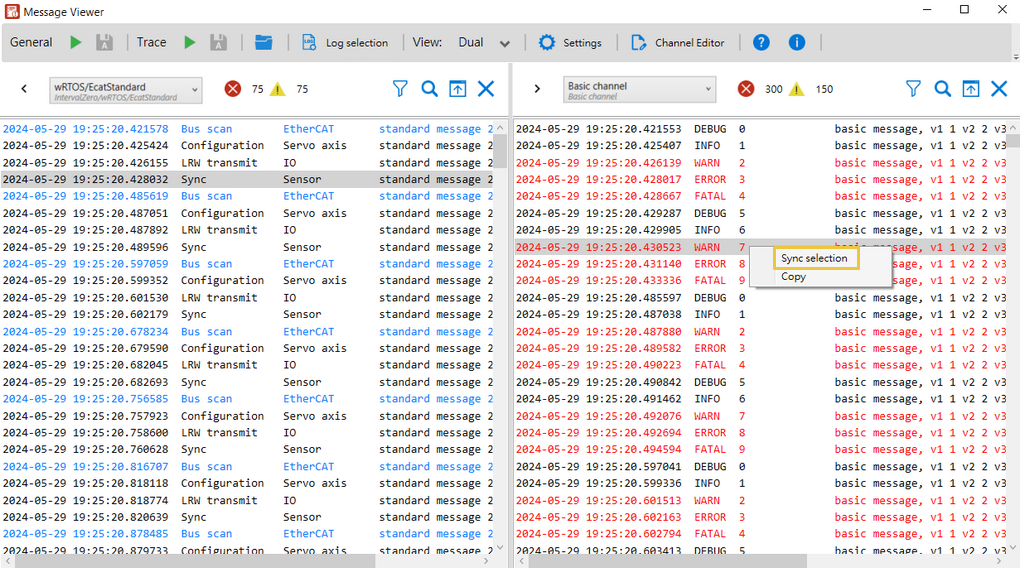
Message View
Messages sent from real-time applications are displayed in the Message View.
View Mode
You can display messages in a single view or a dual view by selecting Single or Dual from the View drop-down list on the toolbar. To display a channel's messages, select it from the Channel List drop-down.
Note: Only the enabled channels are displayed on the Channel List. To enable channels, see "Enable channel" in Log Selection.
String Messages
Since string interpolation in the messages consumes a significant amount of time in your real-time application, you can use Message Viewer for string interpolation to minimize the impact on your application's performance. The Message Viewer uses standard .NET string formatting to insert the values in the message text. To do this:
- For Basic channel messages: Send a format template through parameter pMessage in RtdbgSendBasicMessage. The Message Viewer formats the parameter pMessage using the provided values Value0, Value1, Value2, and Value3. The formatted message is created by applying the .NET's string.Format method on the pMessage string.
formattedMessage = string.Format(pMessage, Value0, Value1, Value2, Value3);
For example, if parameter pMessage is "Error occurred at {0} with code {1}", Value0 is 404 and Value1 is 500, the pMessage will be formatted as "Error occurred at 404 with code 500" on the Message Viewer.
- For Standard channel messages: Define parameter MessageFormat in RtdbgSendMessage.
Message Color
By default, the text color of warning, error and fatal messages is red. You can define text color for messages using Channel Editor.
Copy and Synchronization
You can perform the Copy and Synchronization functions on the view. The Copy function can be performed on both Single and Dual views, while the Synchronization function can only be performed on the Dual view. With the Synchronization function, you can synchronize messages from different channels that occur at specific times.
To copy messages and paste them to another location:
- Select messages displayed on the view.
- Right-click and select Copy.
- Paste the copied messages to another location.
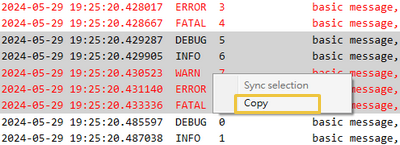
To synchronize a message with the closest one in time:
- Select Dual from the View drop-down list and choose a channel for each view.
- On one view, right-click a message you want to synchronize, then select Sync selection.
- The closest message in time on the other view will be highlighted.
Settings
Settings allow you to set up general configurations for messages. To open the Settings window, select Settings on the toolbar.

- Format: Select the desired date and time options to include timestamps in the messages. For example, if all options are selected and YYYY-MM-DD is chosen for the Date format, the messages will appear with timestamps like this: 2024-05-22 15:40:15.110628. You can only select Microseconds when Milliseconds is also selected, as Microsecond is a smaller unit of time than Millisecond.
- Log to files: You can configure the storage settings for messages.
- Destination folder: Select a folder to save message files. To change a folder, you must first stop logging messages.
- Maximum log file size: Specify the size of each individual message file. A new file will be created automatically when the current one reaches this limit. The size can range from 0.2 to 100 MB, with a default size of 10 MB.
- Maximum log files: Specify the maximum number of message files that will be stored. A new file is created when the file size reaches the maximum size of a message file. Setting it to zero allows unlimited files, which can consume significant hard drive capacity. If the number of files exceeds the limit, the oldest file will be deleted.
For example, if you set the Maximum log file size to 0.5 MB and Maximum log files to 5, the destination folder will contain up to 5 message files. These files will store messages in the order they were created. Each file will be approximately 500 KB.
Filter
You can decide whether to display certain messages by selecting message options, or by entering text. To open the Filter window, select the Filter icon on the toolbar.
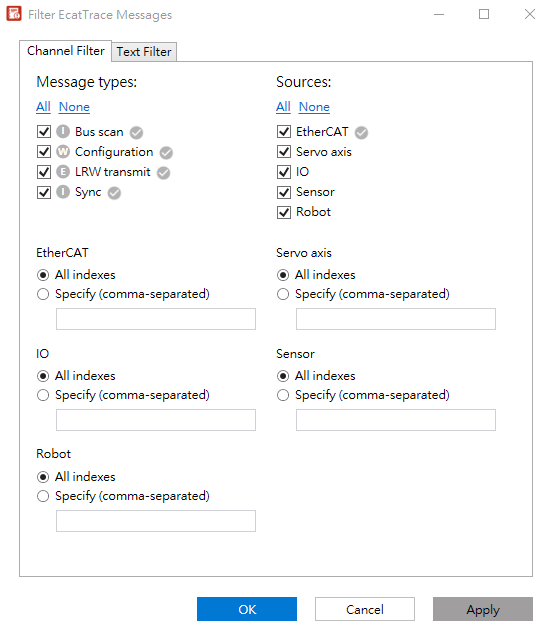
The above image shows a filter window opened in a Trace channel view. The content in the filter window differs among Basic, Standard, and Trace channels.
Channel Filter
Select the Channel Filter tab to display certain messages by selecting message options. Messages associated with the selected options will be displayed in the view. In contrast, messages associated with the deselected (filtered) options will be hidden from view but remain recorded in the background.
The check marks appended to the options indicate they are enabled in Log Selection. Only options with check marks are affected by filtering. If you select an option not enabled in Log Selection, it won't be displayed on the Message Viewer.
Text Filter
Select the Text Filter tab if you want to display certain messages by entering text. Enter the text in the Include in results box to include messages containing the entered text. Enter the text in the Exclude from results box to exclude messages containing the entered text. You can enter multiple texts separated by semicolons (e.g., standard; error; 10:50). Casing does not affect the filter results.
Search
You can search for messages by message type or text. Casing does not affect search results. To open the Search panel at the bottom of the window, select the Search icon on the toolbar.
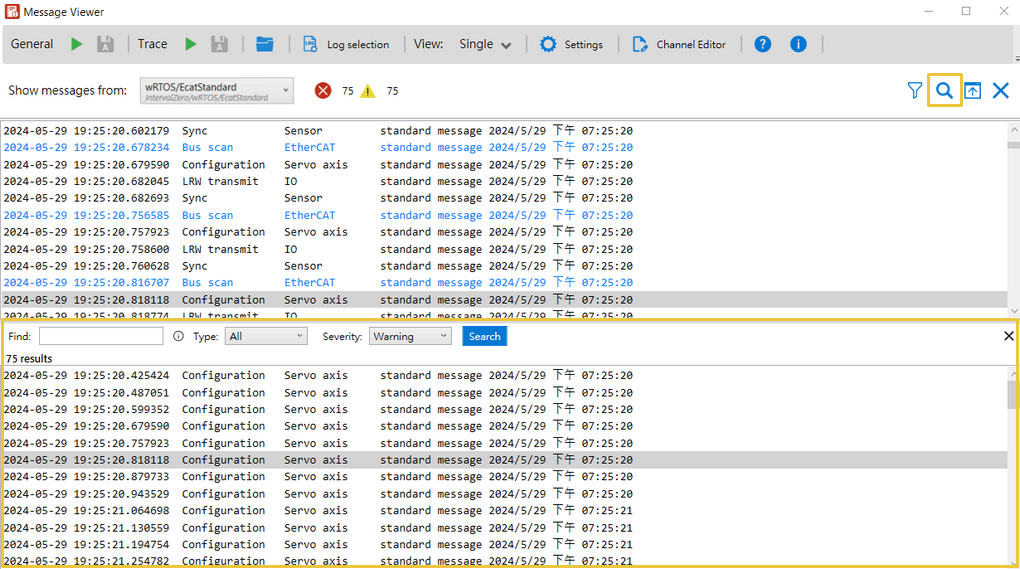
To search for messages:
- Select the Search button in the view. The Search panel will appear at the bottom.
- Use the search criteria to search for messages.
- To search for messages by text, enter the text in the Find box.
- To search for text in a specific message type, enter the text in the Find box and select a specific message type from the Type drop-down list.
- To search for messages by message type only, leave the Find box blank and select a message type from the Type drop-down list.
- If the selected message type is from a Standard or Trace channel, you can select a severity from the Severity drop-down list.
- Select the Search button in the Search panel to display the search results.
- Double-clicking a certain message in the search results will navigate to the corresponding one in the Message View.
