The wRTOS Scope provides a graphical interface to monitor and record real-time variables from active Variable Databases. This section guides you through the workflow of configuring channels, groups, recording settings, and executing recording.
In this section:
- Adding a Variable to a Channel
- Adding Channels to a Group
- Recording Variables
- Zooming and Panning the Y-Axis of a Channel or Group
Adding a Variable to a Channel
Before you start recording variables, you must add variables to channels. Ensure the Subsystem and log server are started when adding variables.
To add a variable to a channel:
- Click the Add button in the Channel List, the Add Channel dialog appears.
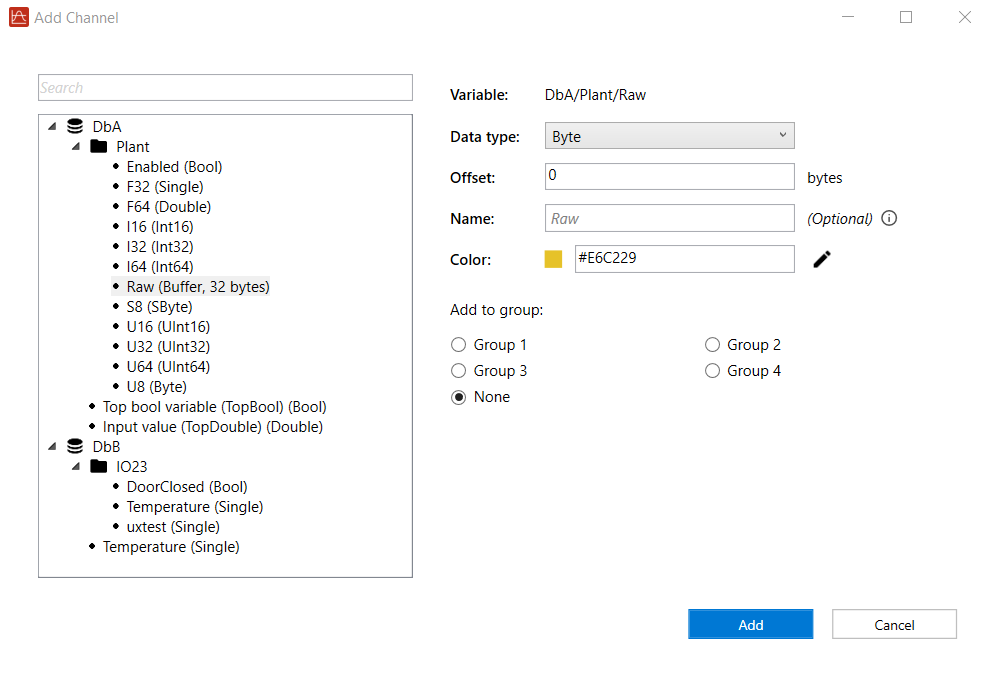
- In the left-side section, select a variable from the tree that contains databases, directories, and variables. You can also search for a variable by entering text in the Search box.
- Configure the variable settings in the right-side section:
- Variable: Displays the selected variable.
- Data type: Displays the data type of the selected variable. If the variable is a buffer, you can select a data type from the drop-down list. After selecting a data type, enter an offset value, in bytes, in the Offset box.
- Offset: This option is available only when the selected variable is a buffer. Enter an offset value in bytes.
- Name (optional): Enter a custom name to display in the Channel List. If no name is provided, the tool uses the variable name.
- Color: Specifies the color of the channel, including the channel trace.
- Add to group: Adds the channel to the selected group. The channel is displayed in the corresponding Group List. Select None if you don't want to add the channel to a group. You can also use the Manage groups button to group channels. See Adding Channels to a Group.
- Click Add to add the variable to the channel.
- Repeat steps 1 to 4 to add variables to channels until all eight channels are configured.
Adding Channels to a Group
After adding variables to channels, you can optionally group channels. This function is useful when you want to check different variables within a database or compare identical variables from different databases.
To add a channel to a group:
- Click the Manage groups button in the upper-right window. The Manage groups dialog appears.
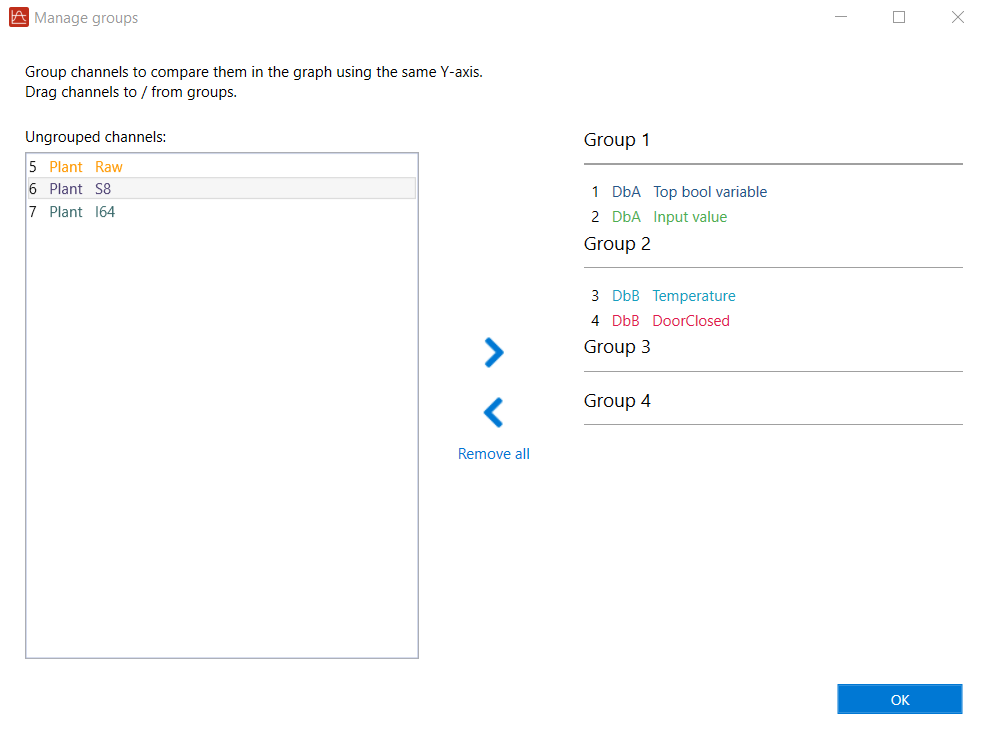
- Drag a channel from the Ungrouped channels field and drop it to a specific group. Similarly, you can drag and drop channels between different groups. To remove a channel from a group, drag the channel and drop it back to the Ungrouped channels field. You can also use the <, >, and Remove all buttons to move or clear channels.
- Click OK. The configured channel groups are displayed in the Group List
- You can perform the following actions within the Group List:
- Click a channel number to show or hide its corresponding channel trace in the chart.
- Click a group to select it. When selected, the Selection Indicator to the left of the group name becomes active, and all channels within that group are selected simultaneously. You can then use the function buttons on the Sidebar to control the chart view, such as scrolling the mouse wheel to zoom the Y-axes for all channels in the group. To deselect the group, click it again.
You can also use the Add to group setting in the Add Channel dialog to add a specific channel to a group. See Adding a Variable to a Channel.
Recording Variables
After adding variables to channels and configuring the recording settings, you can start recording variables.
To record variable:
- Ensure variables are added to channels. To add variables to channels, see Adding a Variable to a Channel.
- Select a recording mode: Manual or Trigger.
Before selecting a recording mode, you must configure the recording mode settings.

To configure the Manual recording mode:
- Select Manual if you want to manually start and stop recording.
- Enter a value in the Duration box. The default value is 10 seconds. Valid values range from 1 to 120 seconds.
To configure the Trigger recording mode:
- Select Trigger if you want the tool to start recording when the specified trigger condition is met. Enable the Repeat
 button to allow recording to be triggered repeatedly. Disable the Repeat button to allow recording to be triggered only once.
 - Enter a value in the Duration box. The default value is 10 seconds. Valid values range from 1 to 120 seconds.
- Set up the trigger conditions in the Trigger condition field:
- Select a variable from the Source drop-down list.
- Enter a value in the Level box to specify the threshold that triggers recording.
- Select Above/Below to trigger recording when the Source value is greater/less than or equal to the specified Level.
- Click the Start recording button. The tool starts recording.
- (Optional) Click Zoom to fit
 to display all traces in the chart. You can use other function buttons on the Sidebar to control the chart.
 - Click Stop recording to stop recording.
Zooming and Panning the Y-Axis of a Channel or Group
When multiple channels are being recorded simultaneously, the channel traces in the chart may become difficult to distinguish. You can zoom and pan the Y-axis of a channel or group to separate and organize the traces.
The following example demonstrates how to zoom and pan the Y-axis of a single channel.
To zoom and pan the Y-axis of a channel:
- Click a channel in the Channel List. The Selection Indicator
 becomes active.
Note: If the selected channel belongs to a group, all channels in the same group are also selected.
- Click Y in the Sidebar.
- To zoom the Y-axis of the selected channel, move the mouse pointer over the chart and scroll the mouse wheel up or down.
- To pan the Y-axis of the selected channel, move the mouse pointer over the chart, right-click and hold, then move the mouse up or down.
- To deselect the channel, click the channel again in the Channel List. You can also double-click the Target Y-axis for zoom/pan button to restore the selection to All.
Related topics:
