Getting Started with RTX64 Runtime
In this section, we show you how to boot into the RTX64 configuration, how to configure and control various Runtime components, and we also highlight a few of the key Runtime tools and utilities.
TOPICS:
Booting into the RTX64 Configuration
Booting into the RTX64 Configuration
An RTX64 boot configuration is created when RTX64 is configured following installation. The RTX64 boot configuration appears in the following format:
[Operating System] - RTX64
For more information on how to create an RTX64 boot configuration, see Setting the RTSS Boot Configuration.
IMPORTANT! If you boot into a non-RTX64 configuration during startup, you will encounter a warning message and RTX64 may not behave as expected.
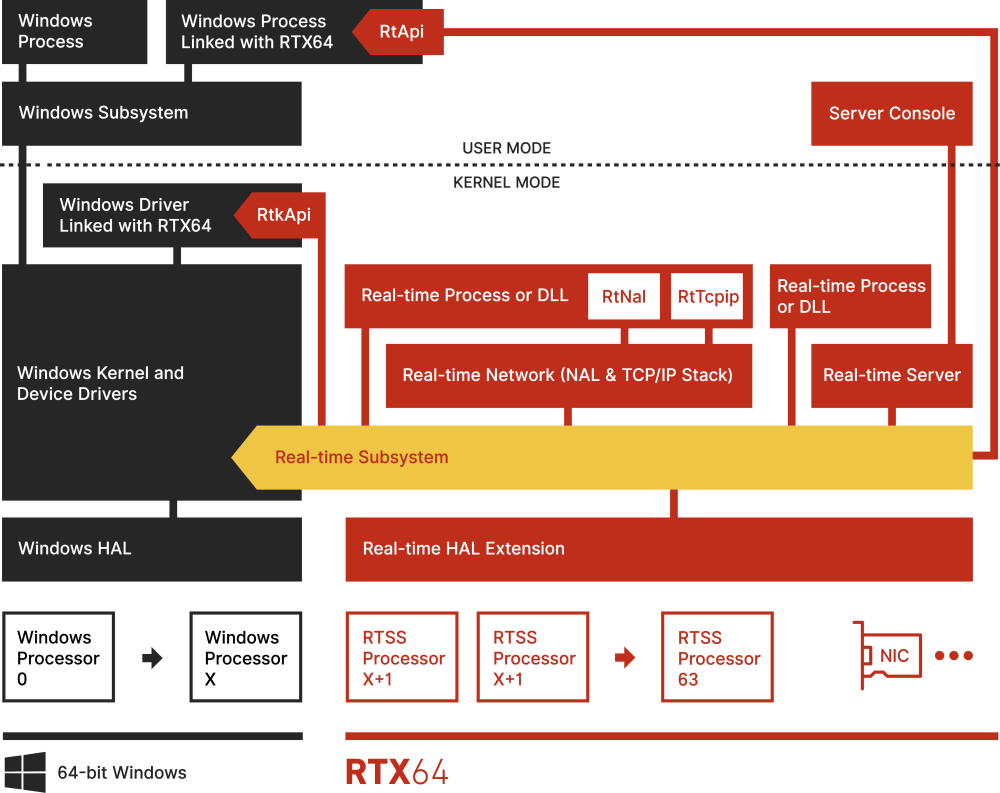
About the Real-time Subsystem (RTSS)
When RTX64 (Real-Time Extension) is installed on Windows, it enhances support for time-critical tasks by providing a Real-time Subsystem (RTSS) which has the ability to dedicate processors/cores to RTSS processes and threads, and communicate with Windows processes and threads.
The Real-time Subsystem (RTSS) provides a priority based preemptive scheduler that is Symmetric-Multiprocessor aware. This allows for scheduling of RTSS threads across all dedicated RTSS processors, while still allowing communication with Windows processes (RTAPI) and drivers (RTKAPI) through standard inter-process communication (IPC) and shared memory.
Configuring the Real-time Subsystem
You can use RTX64 Control Panel to configure default settings for the Real-time Subsystem, including internal system behavior, memory management, monitoring, exception handling, power management, remote debugging, and real-time application output.
The Configure the RTSS Subsystem page contains the following options:
| Option | Name | Description |
|---|---|---|

|
|
|

|
|
|

|
Change monitoring settings |
|

|
|
|

|
Configure exception support |
|

|
Configure power management settings |
|

|
Configure the search path |
|

|
Configure real-time application output |
|

|
Configure remote debugging |
NOTE: The RTX64 Remote Debugger is an optional Runtime feature. These settings will only appear in the Control Panel when the RTX64 Remote Debugger feature is installed. |
to open the control panel:
In the Start menu, navigate to RTX64 <Version> Runtime and click RTX64 Control Panel.
NOTE: In some instances, you may need to stop the Subsystem before you can modify a configuration setting.
Starting and Stopping the Subsystem
To start/stop the Subsystem from the Control Panel:
You can start and stop the RTSS Subsystem and associated components directly from the information panel on the right side of the Control Panel Home page.
To start the Subsystem, click the Start icon.

Note that this also starts the Network Abstraction Layer (NAL), if it is configured to start with the Subsystem, and the TCP/IP Stack, if the Stack is licensed and configured to start with the NAL.
To stop the subsystem, click the Stop icon.

For more information, see Starting and Stopping Components in the RTX64 Control Panel.
Changing the HAL Timer Period of the Subsystem
The RTX64 HAL Timer is the primary timer that the RTX64 Subsystem uses for all internal synchronization, timers and wait functionality. The default value for the subsystem HAL Timer Period is 100 microseconds. This value can be as low as 1 microsecond or as large as 1,000 microseconds.
This value can have an impact on the responsiveness of your subsystems and applications. Application timers can only have periods as small as the subsystem's HAL timer period or a multiple of it. For example if the HAL timer period is 50 you can create a timer with a period of 50, 100, 200, but not of 130. A value of 130 would be rounded up to 150.
You can change the HAL Timer Period in the RTX64 Control Panel under Configure the RTSS Subsystem > Change internal system behavior.
NOTE: Use caution when setting the HAL timer period below 20 microseconds. If the HAL timer period is set too low it can inversely impact performance or cause your system to hang. Fully test the timer period you set with your real-time application on all systems on which you will deploy to verify that the hardware can accomplish the compilations required in the period set.
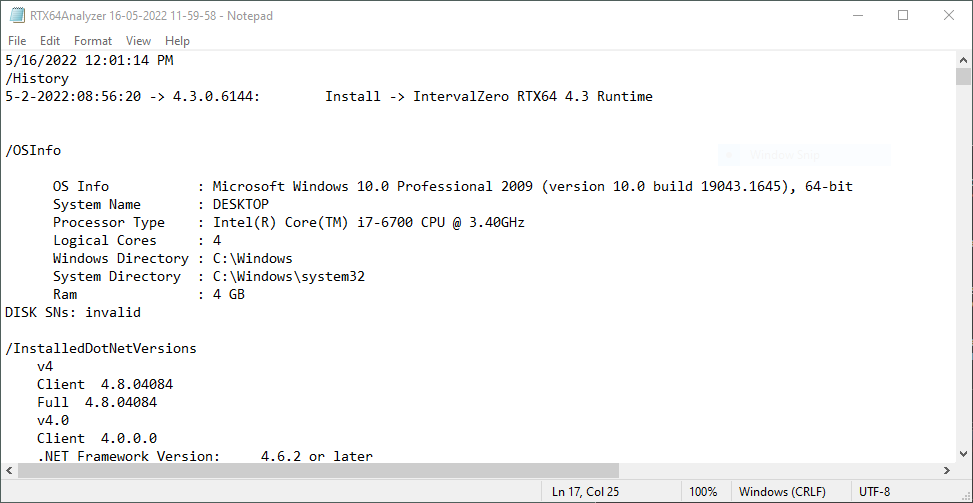
Gathering Configuration Information
Sometimes it is useful to gather information about your current system state. You can use RTX64 Analyzer, accessible from the Control Panel, to generate a text file containing your current RTX64 configuration.
Exercise: Changing the available system memory
It is good practice to periodically compare the amount of available system memory in the RTX64 Control Panel with the actual amount in the Windows Task Manager. In this exercise, we will update the Available System Memory setting based on the actual Windows amount.
to update the available system memory:
-
Open the Control Panel.
-
Click Configure the RTSS Subsystem > Manage Memory.
-
Note the amount of system memory available to RTX64. The default value is based on the amount of available memory detected by the RTX64 installer.
You can view the current amount of available system memory in the Windows Task Manager under Performance > Memory. -
To change the amount of available system memory, note the Available value in the Windows Task Manager and enter a value lower than it in the Available system memory text field.
NOTE: The amount of available system memory must be greater than 2 GB.
Running RTSS Processes
You can run RTSS processes using one of these methods:
- Double-clicking on the binary in Windows Explorer
- Starting a task from the RTX64 Task Manager
- Using RtssRun from a command prompt on your target system
The following instructions are only for using RtssRun from a command prompt. For more information on starting and stopping a task from the RTX64 Task Manager, see Task Manager.
starting a task with RtssRun:
- Open a Command Prompt
- Type RtssRun, and then type the full path to the RTSS binary. For example, to run the SRTM binary provided with RTX64:
RtssRun “C:\Program Files\IntervalZero\RTX64\bin\srtm.rtss”
- If RtssRun is successful, a tone will begin and the RTX Server console will open and display text. Upon completion, the SRTM process prints a summary and histogram of latency results.
For more information on SRTM and other samples, see the RTX64 Program Examples.
Stopping RTSS Processes
If you must terminate a RTSS process, you can stop an RTSS application using RTX64 Task Manager or RtssKill from a command prompt on your target system:
NOTE: You should only kill a process if there is no other way to stop the process gracefully. This is the equivalent of using Task manager to stop a running Windows process.
stopping a task with RtssKill:
- Open a Command Prompt
- Type RtssKill and press return, this will display all running RTSS processes on the system.
EXAMPLE OUTPUT
4
Processors
RTX64 Processors: 2,3

PID  NAME  SCHEDULED TASK
----  ----  --------------
1005 Srtm
- If you wish to kill a process, find the process ID, and pass that value to RtssKill. For example, if the process ID was 1005 you would type:
rtsskill 1005
