On the wRTOS Settings Interfaces page, you can add and remove network interfaces and turn them off and on. Once an interface is added on the Interfaces page, a separate interface-specific page appears under Network / Interfaces / where you can configure that interface. See Network Interface Settings.
Note: Many network components require a separate product package and license. See wRTOS Platform Components for more information.
Note: Some settings require Windows Administrator privileges.
In this section:
- Converting a Device to wRTOS
- Adding an Interface
- Viewing and Changing Interface Settings
- Removing an Interface
![]() Accessing Network Interface Settings
Accessing Network Interface Settings
Converting a Device to wRTOS
Before you can add a new network interface, you must first convert that device to wRTOS control.
For more information, see Converting a Windows device to wRTOS.
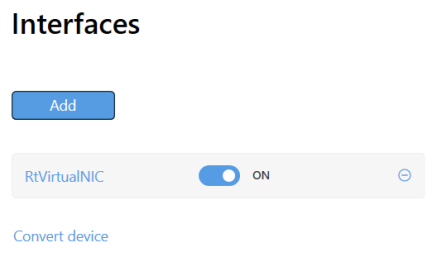
Note: The wRTOS Virtual Network Interface can be optionally installed with the wRTOS Runtime. It is selected by default during installation. If the wRTOS Virtual Network Interface is installed, the Interfaces list will contain an interface called RtVirtualNIC.
Adding an Interface
To add an interface:
- Click Add.
The Add an Interface dialog appears.
Note: A warning will appear if the new interface causes a memory deficit for the real-time network, based on the allocations configured on the wRTOS Settings Memory page.
- Specify a Name for the interface. The name cannot exceed 63 characters or include spaces.
- Select a Real-Time NIC Driver (RTND) from the Device drop-down.
- The proper wRTOS Driver should be selected for a supported NIC card. However, you can Browse for a different driver.
- Specify the PCI bus Location of the network interface card for the interface in the form of three semicolon-separated integers. This field will be auto-populated when a Device is selected.
- Specify a Device Instance ID for the interface. This value corresponds to the Device instance path of the device, which can be found in the Properties dialog of Windows Device Manager. This field is auto-populated when a Device is selected.
- Click Add. The interface for the selected device should now appear on the Interfaces page.
New interfaces are set to ON by default. To turn off an interface, set its toggle switch to OFF.
Note: No more than 50 interfaces can be enabled at one time.
Note: If you are not a member of the wRTOSAdministrators or wRTOSUsers groups, you may encounter an error. For more information on user groups, see User Groups and Access Permissions.
- You must restart the NL2 , TCP/IP, Network Relay, and E-CAT network components (if running) for your changes to take effect. If you plan to configure additional settings that will require a restart of the network, make those changes first and then restart the NL2 when you are finished. You must stop all network-enabled processes before restarting the network.
Viewing and Changing Interface Settings
When an interface is added on the Interfaces page, a separate interface-specific page appears under Network / Interfaces / where you can configure that interface. Click the name of the interface to view the settings for that interface.
Removing an Interface
To remove an interface:
- Find the interface you want to remove from the Interfaces page.
- Click the Delete icon.
![]()
RELATED Topics:
